Manage Email Addresses for Multiple Domains with One Gmail Account Using Opalstack
Some practical advice on how to configure email addresses for multiple domains so that you can still send and receive from a single Gmail account.


The links to Opalstack in the content below are affiliate links. If you create an account with Opalstack, I will receive a commission.
You can do a lot with a single Gmail account.
From a single Gmail account (michael.joseph.wolfe at gmail.com), I send and receive emails at all of the following email addresses:
- mike @ nolongerset.com
- taxcollector @ promptonpa.com
- mike @ pataxsoftware.com
- mike @ grandjean.net
Notice that each of the above email addresses is from a different domain. But all the emails sent to these addresses get stored in a single Gmail account. All the emails sent from these addresses get sent from that same Gmail account.
Read below to see how I set this up.
Create an Opalstack Account
* (NOTE: Opalstack is not a prerequisite to make this work. It just happens to be how I make it work. For alternatives, you might consider a dedicated email forwarding service.)
I believe Opalstack is the most developer-friendly shared web host around.
For $9.50/month (as of writing), you get 50GB of SSD storage, 512MB RAM, and 500 GB/mo of bandwidth. More importantly, you get several developer-centric features that you won't find on many other shared hosting providers:
- Unlimited websites
- One-click app installers for Wordpress, Ghost, Django, Ruby on Rails, etc.
- Shell access
- Let's Encrypt integration
- PostgreSQL and MariaDB (MySQL equivalent) databases
- Email forwarding
- Email hosting
Point Your Domain to Opalstack's Name Servers
Go to your domain's registrar (I use pairdomains.com; the most popular option is probably GoDaddy). Edit the domain's name servers so that they point to Opalstack.
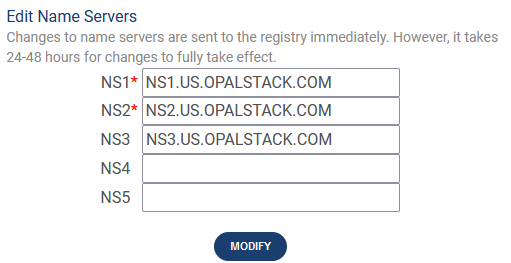
!!!IMPORTANT!!! If this is a brand new domain that you just registered, then changing its name servers is not a big deal. HOWEVER, if your domain has been up for a long time, make sure you understand what changing the nameservers will do. Making these changes can result in your production website becoming unreachable.
Set Up Email Forwarding in Opalstack
Create a dummy mailbox for email forwarding
From the Opalstack control panel, go to the Email page. Click the button in the upper right to [Create Mailbox]. Choose the correct server based on your region. The username does not matter; I prefer a generic name like "forwards."
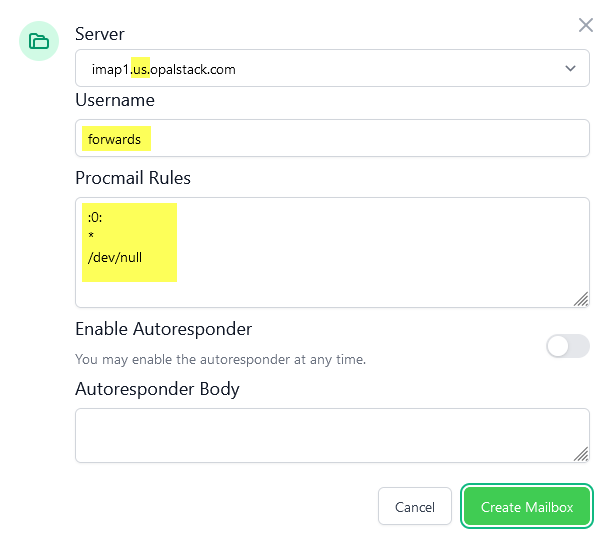
The other important thing to include is a small script in the "Procmail Rules" box. Without this script, a copy of every message will be stored in the mailbox before being forwarded on to its destination.
* (NOTE: This behavior is different from Opalstack's predecessor, Webfaction, but I did not realize this until I wrote this article. When I checked, there were over 100K emails in my own forwards mailbox.).
Here's the procmail script:
:0:
*
/dev/null
The script simply delivers all mail to the null device. We'll set up the actual forwarding in a different part of the process.
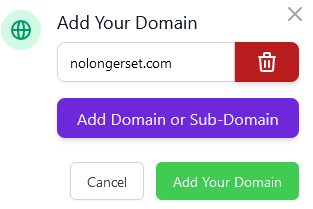
Create a domain record
From the Opalstack control panel, go to the Domains page. Click the button in the upper right to [Add Your Domain]. (For this example, I'll recreate my mike @ nolongerset.com email address.) Add the domain, nolongerset.com.
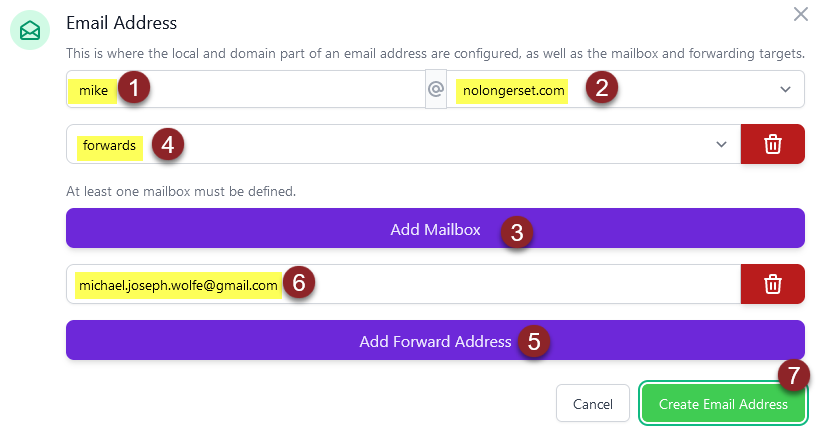
Create an email record
From the Opalstack control panel, go back to the Email page. Click the button in the upper right to [Create Email Address].
- Enter the local part of the email address (to the left of the @ symbol)
- Choose the domain you just added in the previous step
- Click [Add Mailbox]
- Use the dropdown to choose the mailbox you added earlier ("forwards")
- Click [Add Forward Address]
- Enter the address of your GMail account
- Click [Create Email Address]
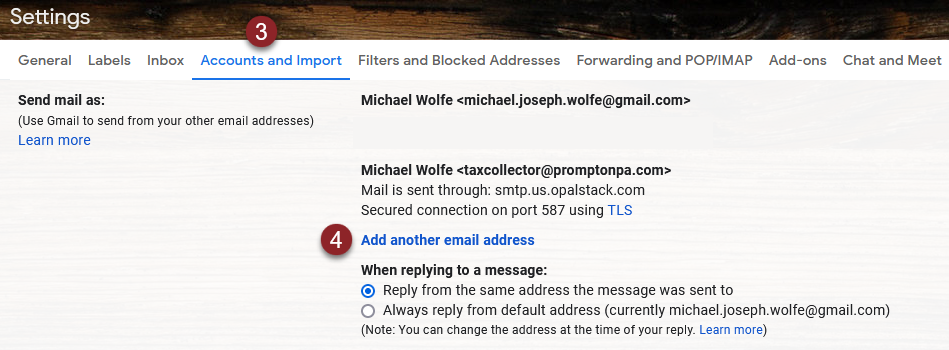
Set Up Send As in Gmail
The final step in the process is to validate the new email address from within Gmail. This is what enables you to send emails from Gmail using an email address that's not an @gmail.com address.
For detailed information, check out the official Google help article, "Send emails from a different address or alias."
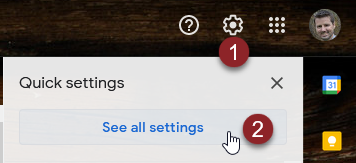
Add another email address
Here are the basic steps:
- Click on the gear icon in Gmail
- Click the [See all settings] button
- Click "Accounts and Import"
- Click "Add another email address"
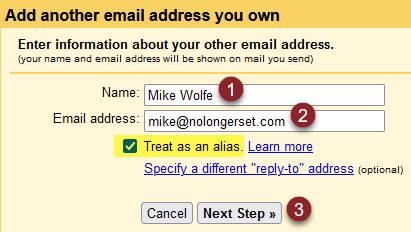
Provide required account information
And here are the remaining steps to actually add the email address:
- Enter how you want your name to display ("Mike Wolfe")
- Enter the email address ("mike@nolongerset.com")
- Click the [Next Step >>] button
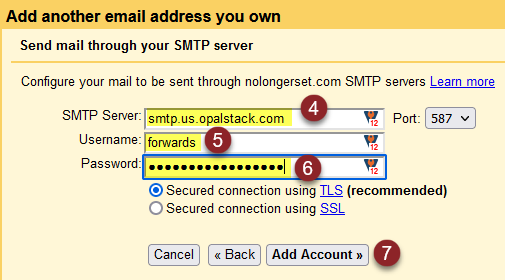
- For SMTP Server, enter
smtp.us.opalstack.com(orsmtp.de.opalstack.com) - For username, enter the mailbox name ("forwards")
- Enter the mailbox password
- Click [Add Account >>]
Verify ownership of the email address
Before you can send emails with the non-gmail.com email address, you will need to prove to Google that you are the owner of the email. Click the link in the verification email and you should be all set.
External Sites
 Brian Jackson

Image by Muhammad Ribkhan from Pixabay