Creating a Low-Privileged Local User for SQL Server Testing
It can be difficult to test how an Access application with a SQL Server backend behaves for a low-privileged user. Creating such a user account is step one.


"It runs on my computer."
The most common reason I find myself saying that to an end user is because I forgot to grant them permission somewhere. Usually, it's a missing permission on a new table, view, or stored procedure in SQL Server. Inevitably, the reason I forgot is because when I'm developing an application, I have a local developer copy of SQL Server where I'm set up with full server admin privileges.
The best way to avoid that situation is to test with a low-privileged user account.
Creating a New Local User Account
In this article, I'll take you through three different ways to add a new local user to your computer.
These steps are most relevant if you are not joined to an Active Directory domain. However, I believe they should still work even if you are on a domain-joined workstation (assuming you have the requisite permissions). That said, if you are joined to a domain, you may want to consider adding a low-privileged network user account via Active Directory Users and Computers (ADUC), as that will allow you to test additional scenarios.
There are multiple ways to create a local user account. I highly recommend the first option, but I will show the other two alternatives for completeness and to help you understand what the script is doing.
Use a Simple Password
This is an account that will have–by design–very few privileges.
However, you will likely find yourself entering the password more frequently than with other accounts, so I would recommend choosing one that is simple to type versus something more secure. For obvious reasons, you should not use the password make-it-short that I hard-coded in my examples. Instead, you should replace that password with a similar one, perhaps one randomly generated via the tool embedded below from PasswordCreator.org.
The passwords listed below are all good options (for this situation).
I do recommend you use the same account name and password if you have multiple development computers. That will make it easier for you to connect to SQL Server if the database is located on a remote computer and your computers are not joined to a domain.
Suggested Passwords
For more details, refer to my Password Generator article.
Create the Account Using PowerShell
One of my steps to go from writing code to developing software is to "script everything."
In that spirit, we'll start with a PowerShell script to create a local user account. I like to use the PowerShell Integrated Scripting Environment (ISE). You will need to run this script as an administrator.
IMPORTANT: Before you do anything, make sure you read the explanation below the script so that you understand what it does. You should never run a script you found on the internet–especially with admin privileges!–unless you understand what it is doing.
The following shortcut keys are the fastest way to run the script shown below:
- [Win] + [X] > (release the Windows key) > [A]
- Type
iseand press [Enter] - Copy and paste the script from below into the top of the window
- Replace the hard-coded password "make-it-short" with your own (see above for some randomly generated options)
- Press [F5] to execute the script
# Set the user's information
$userName = "bobbyT"
$fullName = "Little Bobby Tables"
$description = "Low-privileged database test user"
$password = ConvertTo-SecureString "make-it-short" -AsPlainText -Force

# Create the user account
#
# New-LocalUser
#    -Name $userName
#    -FullName $fullName
#    -Description $description
#    -Password $password
#    -UserMayNotChangePassword
#    -PasswordNeverExpires
#
New-LocalUser -Name $userName -FullName $fullName -Description $description -Password $password -UserMayNotChangePassword -PasswordNeverExpiresNew-LocalUser cmdlet, so I used the comments immediately before it to show the full call in a more readable format.Create the Account Using "Local Users and Groups"
- Press the Windows key + R on your keyboard to open the Run dialog box.
- Type "mmc" and press Enter to open the Microsoft Management Console.
- Click on "File" in the top left corner and select "Add/Remove Snap-in".
- In the "Add or Remove Snap-ins" window, select "Local Users and Groups" and click "Add".
- In the "Select Computer" window, choose "Local computer" and click "Finish".
- Click "OK" in the "Add or Remove Snap-ins" window to add the snap-in to the MMC.
- In the MMC, expand "Local Users and Groups" and select "Users".
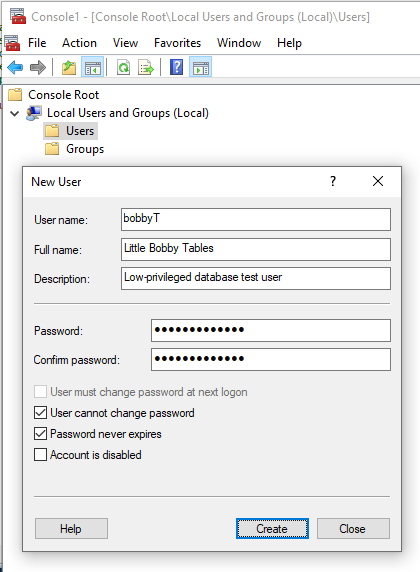
- Right-click in the right-hand pane and select "New User".
- In the "New User" window, enter the following information:
- User name:
bobbyT - Full name:
Little Bobby Tables - Description:
Low-privileged database test user - Password:
make-it-short - Confirm password:
make-it-short
- Uncheck the box for "User must change password at next logon".
- Check the "User cannot change password" checkbox.
- Check the "Password never expires" checkbox.
- Ensure that the "Account is disabled" checkbox is unchecked.
- Click "Create" to create the user account.
- Click "Close" to close the "New User" dialog box (the box remains open to make it easy to add more accounts if you needed to).
That's it! You have now created a new local Windows user account with the specified settings via the "Local Users and Groups" snap-in within the Microsoft Management Console.
Create the Account Using Windows Settings
Here are step-by-step instructions for how to create a new local Windows user account via Windows Settings:
- Click on the "Start" menu button and select "Settings" (the gear icon).
- Click on "Accounts".
- Click on "Family & other users".
- Under "Other users", click on "Add someone else to this PC".
- In the "How will this person sign in?" window, click on "I don't have this person's sign-in information".
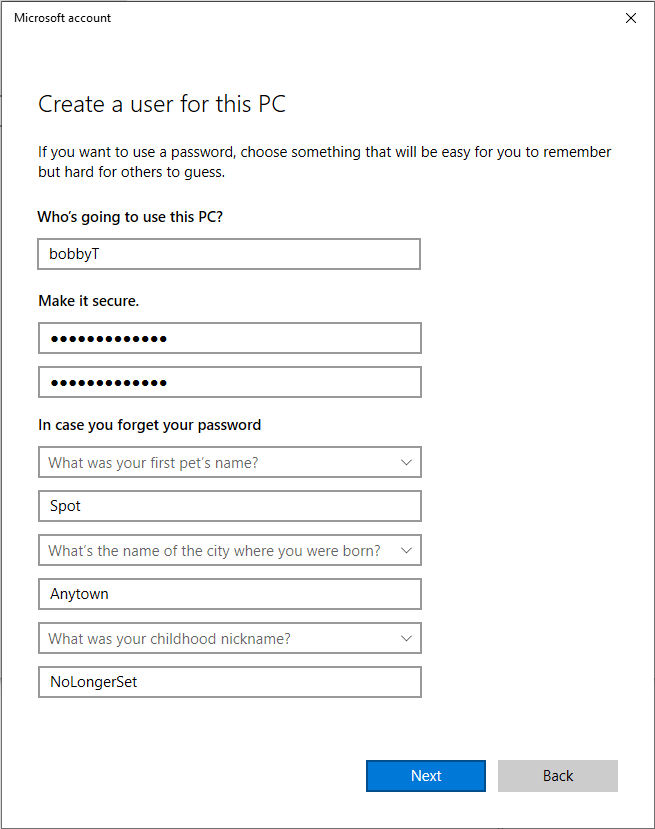
- In the "Add a user" window, click on "Add a user without a Microsoft account".
- Enter the following information:
- User name:
bobbyT - Password:
make-it-short{use a password from above} - Confirm password:
make-it-short{use a password from above} - Enter 3 pairs of Q&A for password hints (this is one reason I don't like this approach)
8. Click on [Next] to create the account and close the wizard (NOTE: there is no way to set the full name or description using this method; that's another reason I don't like this approach)
That's it! You have now created a new local Windows user account with the specified settings via Windows Settings.
Little Bobby Tables?
If you've never heard this name before, then congratulations! You are one of today's lucky 10,000:

Cover image created with Microsoft Designer