Add a Custom Right-Click Menu to an Access Control
It's easier than you might think to add a right-click menu to a control on your Access form.


For years, I wished there was an easy way to add right-click menus to my Access forms. It turns out there was an easy way to do it, it just isn't that well-documented. Let's fix that now.
Check out the animated gif below. This is another example of my "Progress Tracker" form design. The first time I used this in an application, I had a separate combo box where users would set the status for a task. That seemed unnecessarily clunky.
The right-click context menu makes this interface much more intuitive.
Step-by-Step: Implementing the Menu
There are four key elements needed to implement this technique:
- Add a Reference to the Microsoft Office xx.0 Object Library
- A Sub to build (and update) the menu
- Function(s) to perform the requested actions
- A control to which we'll attach the menu
Adding a Reference to the Office Object Library
The reference is not strictly necessary (you can use late-binding instead), but having access to IntelliSense and the Object Browser make the development experience more pleasant. And even though this is a versioned library, the parts of the Office Object Library we will be using have been in place since well before Access 2007.
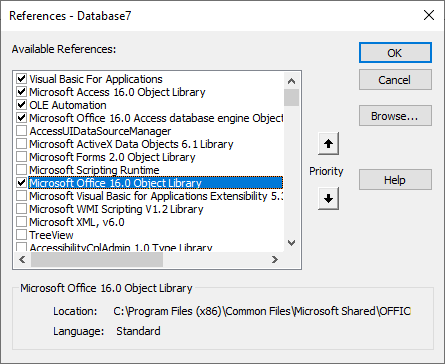
In VBA, go to Tools > References and check the box next to the reference named, "Microsoft Office {xx}.0 Object Library." The version number will match your version of Access; it will be something like 15.0 or 16.0.
TECHNICAL NOTE: This is an example of early binding. Early binding to object libraries can cause compatibility issues when you are dealing with either (A) a library with no regard for backward compatibility or (B) you are using new features that may not exist in old versions of the library. Neither situation applies to the CommandBars-related objects and methods of the Office Object Library that we will be using. This code should safely run in all supported versions of Microsoft Access.
Building the Menu in Code
In Access 2003 and earlier, you could create custom command bars through the user interface. With the introduction of the ribbon in Access 2007, that feature was removed from the development user interface. But the feature itself still remained, lurking in the shadows.
A Brief Note About Built-in Command Bars
There are hundreds of built-in command bars. For these shortcut menus, I advise you to avoid them entirely and create completely new command bars instead. The safest way to avoid naming collisions with the existing command bars is to use a two- or three-character prefix as part of the cmmand bar name.
The CommandBars are stored in a collection. There is no "Exists" function we can call to see if a certain command bar has already been created. Before you create a custom command bar, you should run a quick check to make sure it does not already exist as a built-in command bar (see note above).
To do this, pass the proposed name of your shortcut menu to the CommandBars collection and try to return its .Name property in the Immediate window:
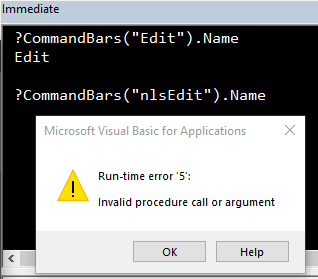
The goal here is to receive the error message shown in the screenshot above:
Run-time error '5':
Invalid procedure call or argument
This tells us that the command bar name we want to use is not already taken by a built-in command bar.
Building the Menu from a Known State
The safest way to make modifications to a command bar is to build it from scratch every time. To make that easier, I wrote a short helper function. This function attempts to delete the command bar in case it already exists. It then creates a new–empty–command bar that we will populate in a different method.
Private Function ResetCustomBar(BarName As String) As Office.CommandBar
    On Error Resume Next
    'Delete bar if it exists
    CommandBars(BarName).Delete
    On Error GoTo 0

    Set ResetCustomBar = CommandBars.Add(BarName, msoBarPopup, False)

End Function
Creating the Actual Menu Bar
Finally, we get to the code where we create the actual menu bar. I recommend that you maintain a separate procedure for each shortcut menu bar that you create. Here's the exact code I used in the right-click menu shown in the animated gif above:
Sub BuildStatusUpdateCmdBar()
    Dim Bar As Office.CommandBar
    Set Bar = ResetCustomBar("ppStatusUpdateCmdBar")

    With Bar.Controls.Add(msoControlButton)
        .Caption = "Not Started"
        .OnAction = "=barSetTaskStatus(0)"
    End With
    With Bar.Controls.Add(msoControlButton)
        .Caption = "In Progress"
        .OnAction = "=barSetTaskStatus(1)"
    End With
    With Bar.Controls.Add(msoControlButton)
        .Caption = "Complete"
        .OnAction = "=barSetTaskStatus(2)"
    End With
    With Bar.Controls.Add(msoControlButton)
        .Caption = "N/A"
        .OnAction = "=barSetTaskStatus(3)"
    End With

    Debug.Print "Command bar "; Bar.Name; " updated"

End Sub
The nice thing about this approach is that whenever you want to add, remove, or rearrange buttons in the shortcut menu, you just update the above Sub routine, re-run it, and you're done! (It's also very version-control friendly.)
There are lots of other CommandBar Control properties and methods you can play around with. To create a simple right-click menu, though, you really only need two:
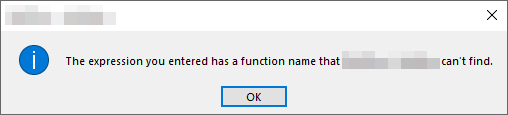
.Caption: This is the text that will appear in the right-click menu..OnAction: This should be set to a literal equal sign, followed by the name of a Public Function.
If you set the OnAction property to a Public Sub or a Private Function, you will get the following error message:
Function to Perform the Selected Action
Next up, you need to write the function(s) that your menu selections have called.
This can be a little tricky because you can't directly pass the value of the current record when you call the function. The Screen.ActiveControl property is your friend here.
The Screen.ActiveControl property returns a generic Form object.
However, if you know what the control is you can assign it to a more specific object. We can then take things one step further, and reference the control's parent form property to get access to the current record's data. If we assign the parent property to an instance of the specific form (e.g., Dim TaskSF As Form_TaskSF in the code below), we can even get IntelliSense and compile-time error checking.
Here's more sample code:
Public Function barSetTaskStatus(luStatusID As st__Status)
    Dim btnChangeStatus As Access.CommandButton
    Set btnChangeStatus = Screen.ActiveControl

    Dim TaskSF As Form_TaskSF
    Set TaskSF = btnChangeStatus.Parent

    Dim TaskID As Long
    TaskID = TaskSF.TaskID

    SetTaskStatus TaskID, luStatusID
    TaskSF.RecordsetClone.Requery   'https://nolongerset.com/requery-a-form-in-place/
    'MsgBox "Set Task Status to " & luStatusID & " on TaskID:" & TaskID
End Function
You may be wondering why I went to the extra trouble of using the button's .Parent property to get to the form instead of calling Screen.ActiveForm directly.
One word: subforms.
The Screen.ActiveForm property will return an instance of the top-level form and not the subform. The following code blows up with run-time error 13, "Type mismatch," because Form_TaskSF is a subform.
Dim TaskSF As Form_TaskSF
Set TaskSF = Screen.ActiveForm
Attaching the Menu to a Control
Decide which control(s) you want to connect the shortcut menu to. Select the control and go to the Other tab in the control's property sheet. Set the Shortcut Menu Bar property to the name of the menu you created above:
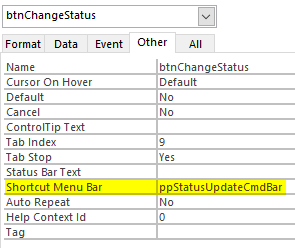
You can also attach the menu to the entire form. Simply use the Form's Shortcut Menu Bar property instead of the controls. Yes, you can assign one shortcut menu to the form and additional shortcut menu bars to controls on the form. In that situation, the control's shortcut menu takes priority.
While only certain controls have a Shortcut Menu Bar property (e.g., Labels do not), you can still set up a right-click target pretty much anywhere you want by using transparent command buttons. That's exactly what I used in the animated gif example at the top of the article.
Next Steps
This introduction is just the tip of the iceberg. You can also:
- incorporate sub-menus
- add images
- build the menus dynamically on-demand
You'll have to navigate those particular rabbit holes on your own for now...
Referenced articles
 Mike WolfeMike Wolfe
 Mike Wolfe