Creating Your First Azure SQL Database: The Basics
Part 2 in my series on SQL Azure for Access Developers takes you step-by-step through the process of creating a new Azure SQL Database.


This is Part 2 in my series on SQL Azure for Access Developers.
After creating your Azure account, it's time to create your first Azure SQL Database.
As a reminder, I went with the 5 DTU Single Database option for my testing purposes.
Getting Started
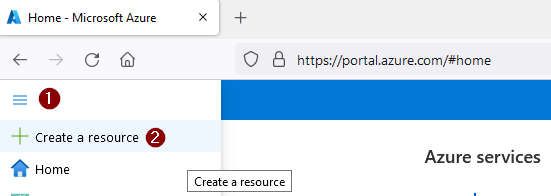
We start by signing in to the Azure portal at https://portal.azure.com/.
Click the hamburger icon in the top left then choose "Create a resource":
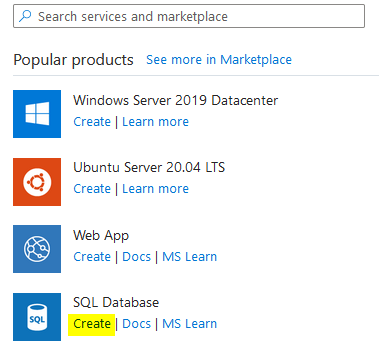
Click the "Create" link under SQL Database:
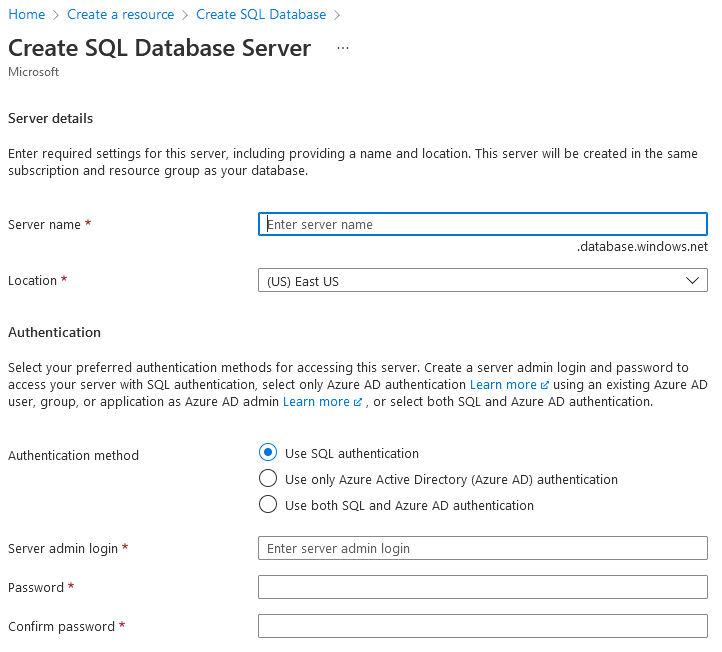
This will bring you to the "Create SQL Database" screen:

Create a Resource Group
If this is a brand new Azure account, you will need to create a "resource group":
A resource group is a collection of resources that share the same lifecycle, permissions, and policies.
The way I interpret this is that I should have a separate resource group for:
- Each client for which I host multiple databases
- Each application for which I host databases for multiple clients
- A dedicated resource group for my internal company use
Since I'm starting out by migrating a handful of internal company utility Access databases to Azure, the first Resource Group I create will be one for our internal use.
I'm naming my first Resource Group "GB" (for Grandjean & Braverman).

Choose a Database Name
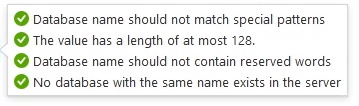
The database name need only be unique within your logical database server (which we will set up in the next step). Beyond that there are a handful of other requirements:
- Database name should not match special patterns
- The value has a length of at most 128
- Database name should not contain reserved words
- No database with the same name exists in the server
In a previous article, I wrote about my decision to choose the 5-DTU Single Database package at about $5/mo. This package provides exactly one database with up to 2 GB of storage.
However, I plan on migrating data from several backend .mdb/.accdb database files that hold data for multiple front-end applications. The total disk size of all of my existing databases is under 500 MB, though. So, to save some money, I will be migrating all of the data into a single database. I plan on using separate SQL Server schemas to help keep everything straight.
I should reiterate that all the data in this database is my own internal company data, so there are no security concerns with intermingling data from multiple applications.
If you have a situation where you are supporting lots of clients with a single front-end application, you might want to consider Elastic Pools, which are a more cost-effective way to provision a bunch of smaller databases.
The price of a pool is based only on the amount of resources configured and is independent of the number of databases it contains.
Create a SQL Database Server
Again, with a brand new Azure account, you will need to create at least one database server to host your new Azure database.
Clicking on the "Create new" link under the "Server" dropdown takes you to the "Create SQL Database Server" page:
Choosing a Server Name
The server name must be unique among all Microsoft account. It will become the first word in a subdomain that ends with .database.windows.net. I tried using gb again as my server name, but that was already taken:

It was no surprise that a two-character server name had already been taken. I tried a five-character name instead and that one was available.
Choosing a Server Location
The next thing you will need to do is choose a location for your server. I assume the site defaults to the best location for you based on your IP address.
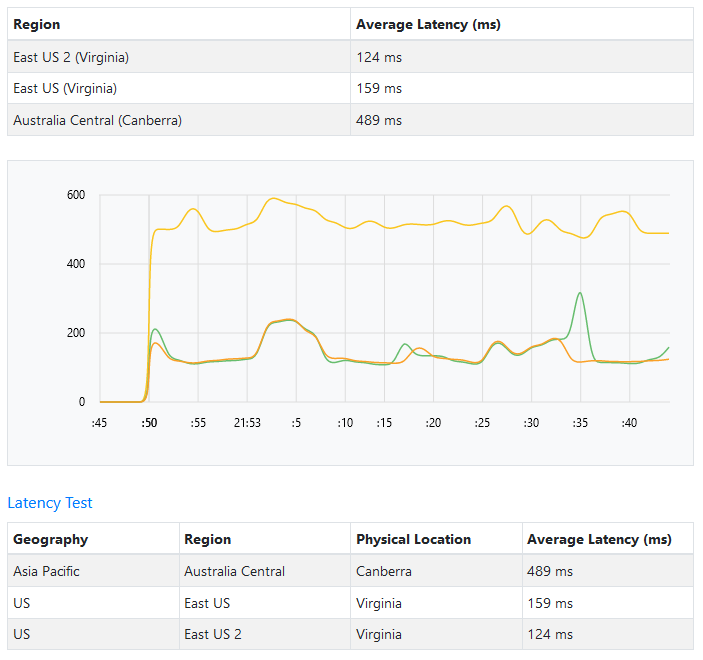
Keep in mind, though, that what really matters is where the bulk of your users will be connecting from. Again, for this database the only users connecting to it will be doing so from northeast Pennsylvania. That makes the East US and East US 2 locations the most obvious choices. So which one should I pick?
The Azure Latency Test is a great free website that you can use to compare latency among Azure SQL regions (h/t Kevin Bell). I compared East US vs. East US 2 and...they are basically identical (or at least they were tonight). A server in Australia, though, would take roughly three times longer to reach. This is a noticeable difference in performance.
Authentication
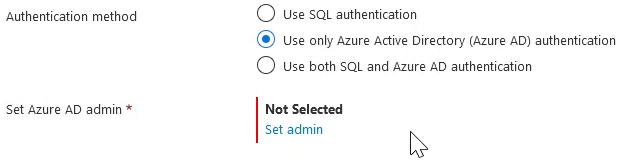
As with SQL Server, I assume that "SQL Authentication" will be less secure than "Active Directory authentication." This is especially true since I have multi-factor authentication enabled for my Microsoft account.
While SQL Authentication will likely be easier to work with, I'd rather begin with the most secure option and figure out how to make it work from the start. Thus, I switched the default Authentication method from "( ) Use SQL Authentication" to "(•) Use only Azure Active Directory (Azure AD) Authentication":
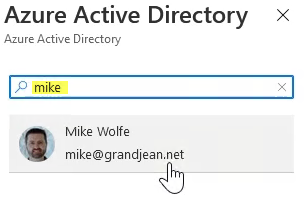
This is one of the areas I was most curious about, because I don't have a standalone license for "Azure Active Directory." I wasn't sure if I would even be able to use this option. I have a Microsoft 365 Business Standard license, and I hoped that would be enough for AAD authentication.
I clicked on Set admin and the Azure Active Directory sidebar opened on the right side of the screen. I saw my account, along with my employees and a few external users from outside my organization that we had invited into one of our MS Teams, uh, teams. I typed in my name and it filtered to show my account:
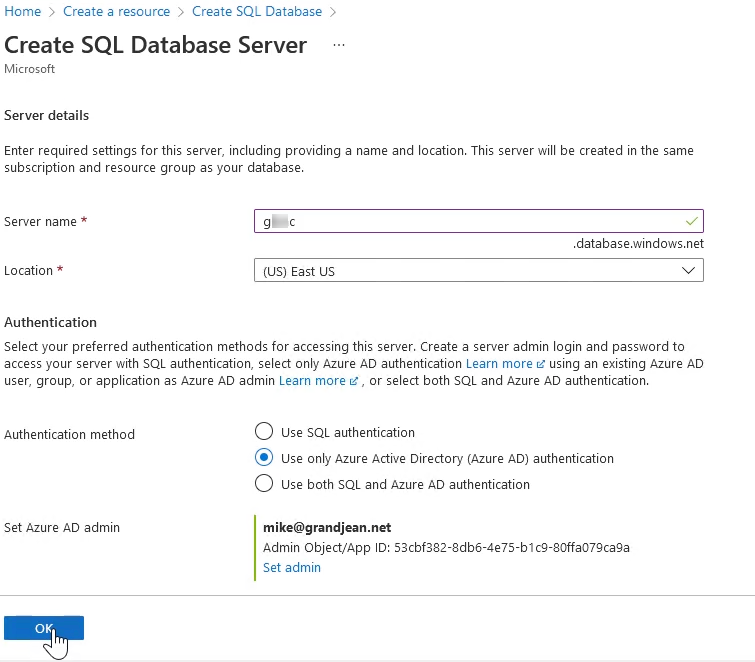
Here's the screen completely filled out:
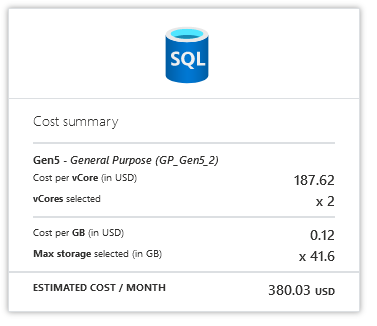
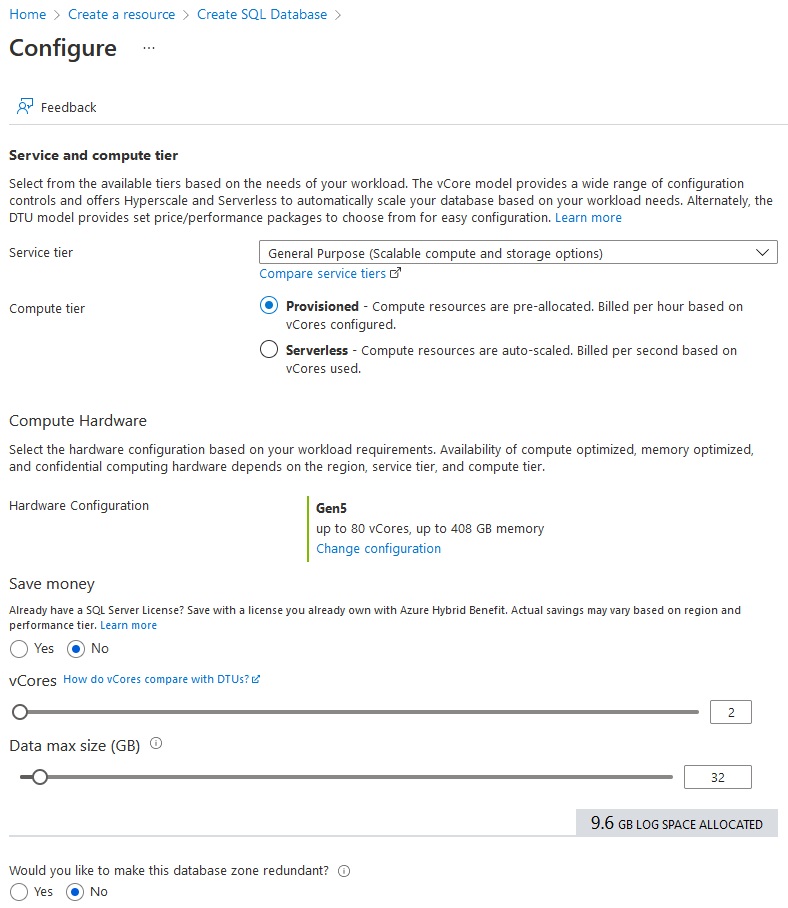
Compute + Storage
The next step is to choose how many resources you need for your database, and, in turn, how much you are willing to pay for said resources.

The default is a vCore-based solution with 32 GB of storage. It also runs about $380/mo:
Configure database
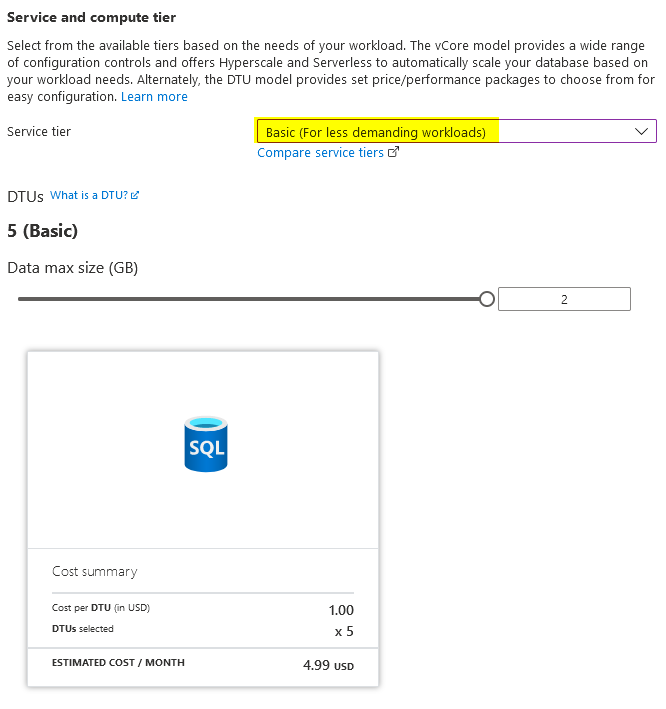
When you click on the "Configure database" link it takes you to a page with a bunch of options:
I was looking for something a little more... basic. Luckily, switching the service tier from "General Purpose" to "Basic", did exactly that. The only option to pick from was the maximum size of the database. And the price stayed the same ($4.99) wherever I positioned the slider, from 100 MB to 2 GB:
Backup Storage Redundancy
The last option we need to choose is how our Point-in-Time Recover (PITR) and Long-Term Recovery (LTR) backups are handled.
- Locally: backups are stored in three places within the same data center (provides protection from drive failure; data is at risk if an entire data center is lost, such as to a fire or flood)
- Zone-redundant: backups are stored in three data centers within a geographic region (provides protection from loss of an entire data center; data is at risk to widespread disasters, such as hurricanes or snow storms)
- Geo-redundant: backups are stored in three places within primary data center and in three places in a geographically distanced secondary region (provides best protection from widespread disasters)
Learn more about Azure Storage Redundancy.
It appears there is no price difference between these three options with the Basic tier, so I went with Geo-redundant backup.
This brings us to the end of the "Basics" tab. We still need to cover the remaining tabs:
- Networking
- Security
- Additional settings
- Tags
- Review + create
I will cover those steps in an upcoming article (or articles).
External references
Referenced articles
 Mike Wolfe