Mailgun: Setting Up a Custom Sending Domain
Set up a custom Mailgun sending domain to replace Outlook COM automation. This guide walks through SPF, DKIM, and MX record setup.


As we Access developers continue to prepare for life after Outlook COM automation, let's continue our exploration of some alternative email sending options.
This article builds on my previous Mailgun Quick Start Guide for VBA Developers:

That article showed how to send an email from the test email account you get when you set up a free Mailgun account. But unless you want all your emails coming from an email address like mailgun@sandbox0123456789abcdef0123456789abcdef.mailgun.org, you will need to set up a custom sending domain.
Choosing a Domain Name
The Free and Basic tiers of Mailgun include 1 custom sending domain, so you have to choose wisely.
If you are an internal Access developer at a non-development company, then you will likely want to use your company's domain (e.g., solostove.com).
If you are a freelance/contract Access developer, you will want to start with your own domain (e.g., grandjean.net [my own company's domain name]).
*NOTE: If you want to send emails from multiple custom domains, you'll likely want to go with the Mailgun Foundation plan. For $35/mo, you get up to 1,000 custom sending domains and 10K emails per month. You can pass along the cost of that plan at the Basic tier price of $15/mo to each client that benefits from it. I'll cover the benefits of that approach in a separate article.
Consider Creating a Subdomain
One option to consider is setting up a subdomain for sending your emails. Mailgun has a great article on why you might want to do that.
Here are a few key benefits of subdomains for email sending:
- Separates marketing from transactional emails
- Maintains independent sender reputations
- Protects overall business email deliverability
- Reduces SPF misconfiguration risk
For this article, I will be configuring a new subdomain on my company's domain: mg.grandjean.net.
Step-by-Step Instructions: Initial Setup
If you are still doing the initial configuration of your Mailgun account, you can use the "Getting Started" link to access the Custom Domain setup area:
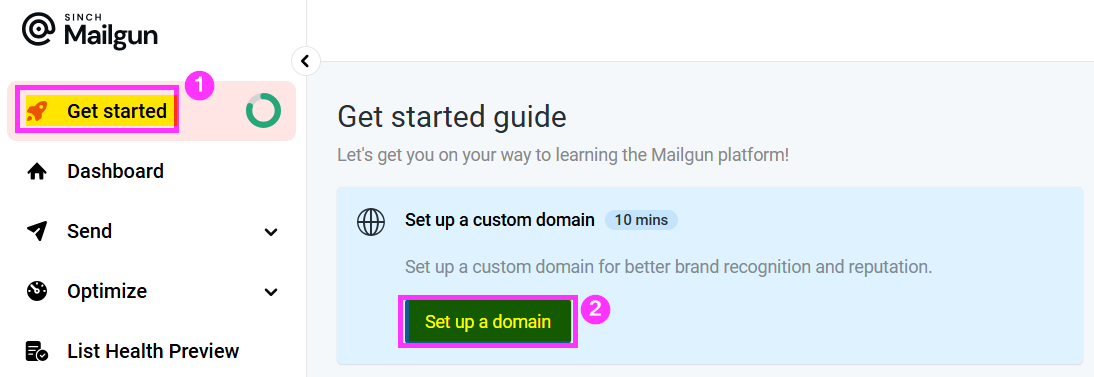
Enter your preferred custom domain name, your sending region (choose EU if you need to comply with GDPR requirements), then click [Add domain].
NOTE: You must own the primary domain name to complete the verification steps below. If you don't already own a domain, you'll have to purchase one from a registrar like GoDaddy or Pair Domains (my provider of choice).

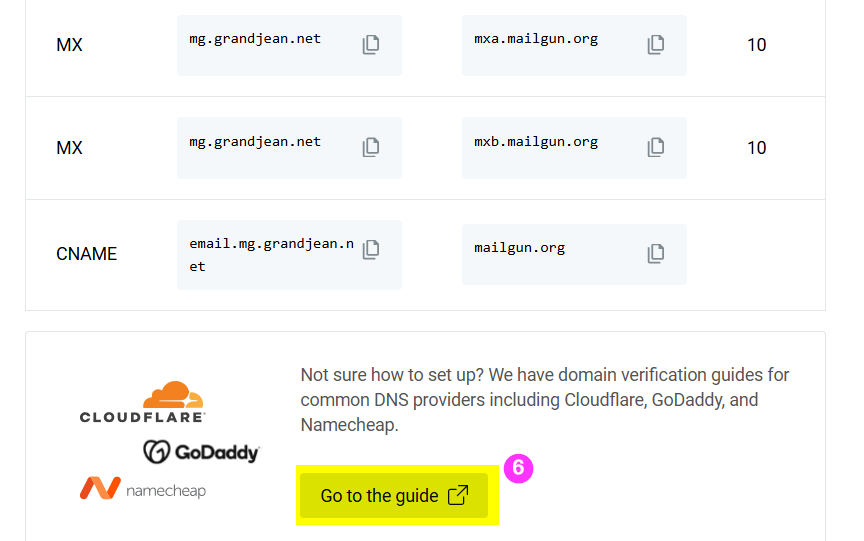
When you click [Add domain], Mailgun will generate DNS record values that you will need to add to your name server:
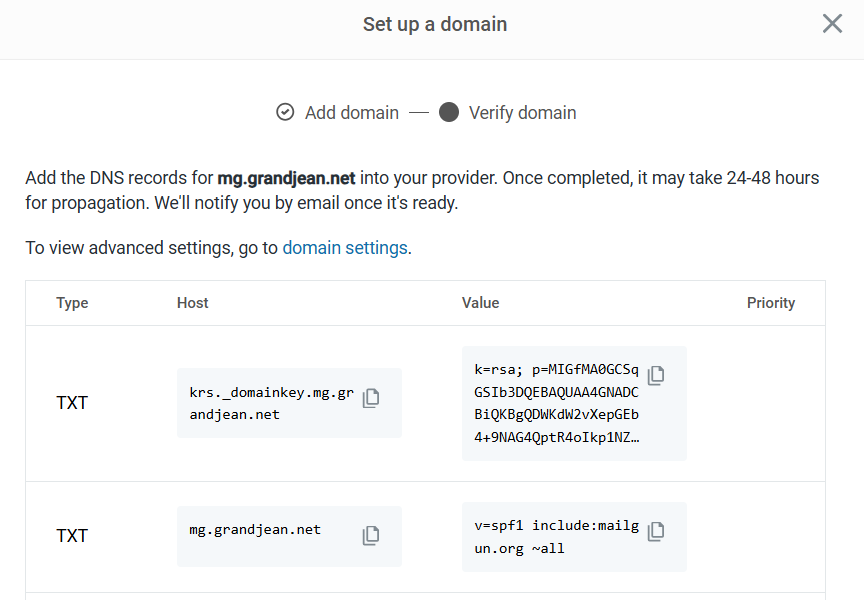
Leave this tab open in your browser for the following steps. You will be copying the values from the above list to complete setup in your name server.
Chances are you are not using the same name server as me. You will probably want to click the button above to [Go to the guide] from Mailgun, which will have provider-specific instructions for setting up these records.
Step-by-Step: Opalstack DNS Configuration
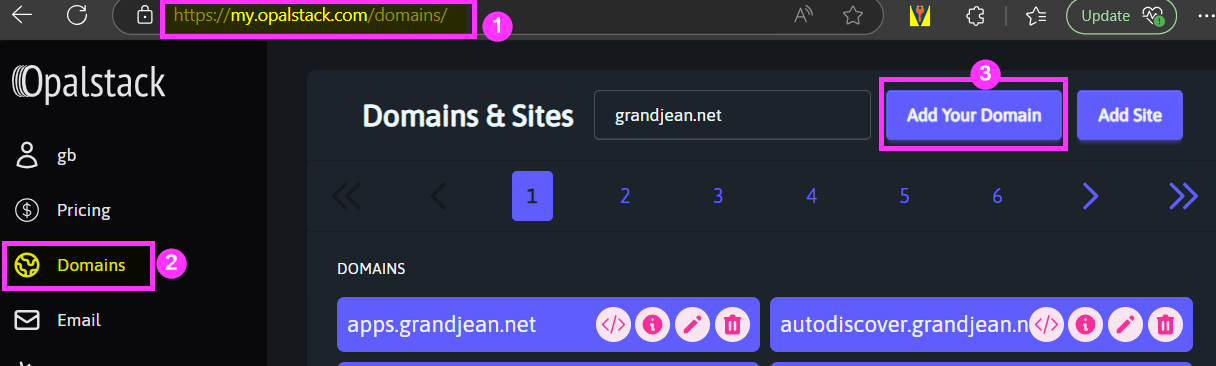
While I use Pair Domains as my domain registrar, my name server (DNS) records are hosted with my shared web host, Opalstack.
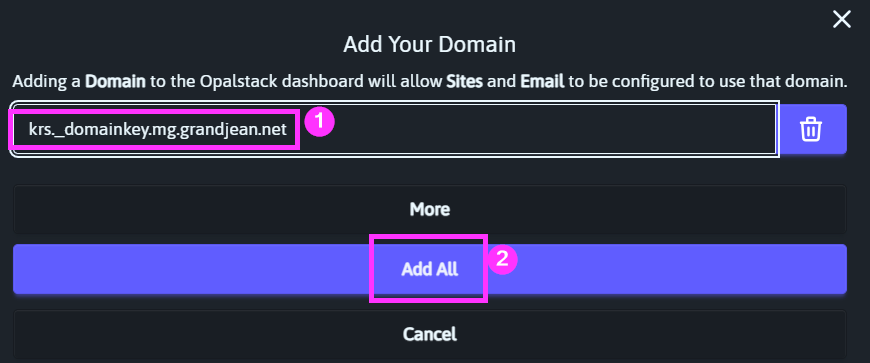
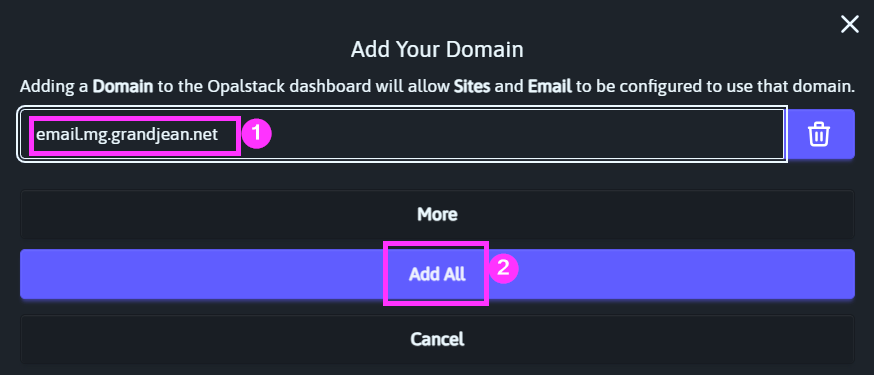
Log in > Domains > [Add Your Domain]
Create the new subdomain by entering the subdomain name then clicking [Add All]:

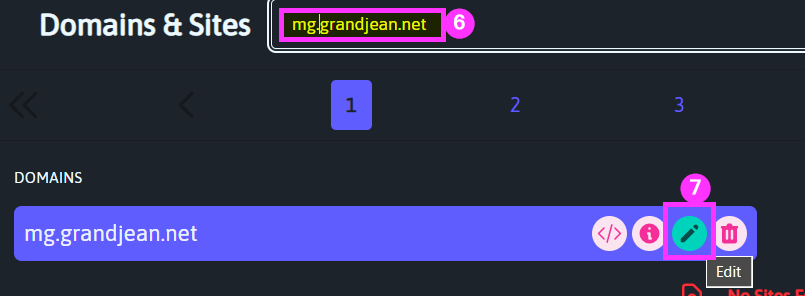
Search for the newly added subdomain name, then click the "Edit" icon:
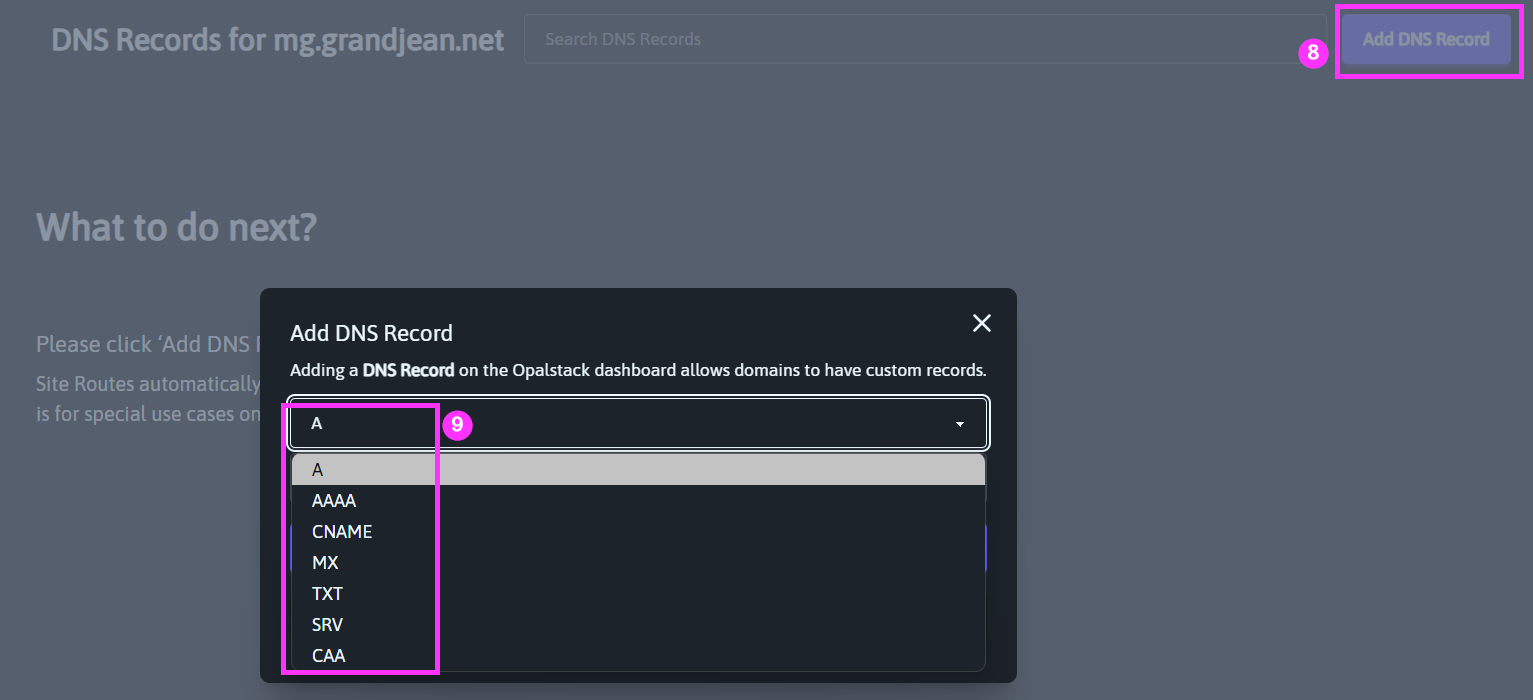
Click [Add DNS Record] then choose the record type that matches each of the record types listed in the Mailgun DNS settings window.
Creating Individual DNS Records
Before blindly filling in these values, it's vitally important that you understand what they are.
If SPF, DKIM, and DMARC make you think of sunscreen, the North Korean dictator, and the eccentric head of Meta, respectively, then you should educate yourself on what they mean in the context of email security and deliverability. Luckily, I've got you covered:
- Beyond the Send Button: How Your Emails Actually Reach Their Destination
- Why Your Emails Get Blocked: Security Protocols and Deliverability Explained
- Putting It All Together: Email Authentication Fundamentals for Access Developers
- SPF Configuration: What Access Developers Need to Know for Reliable Email Delivery
- The Final Pieces: DKIM and DMARC Implementation for Access Developers
DKIM Record
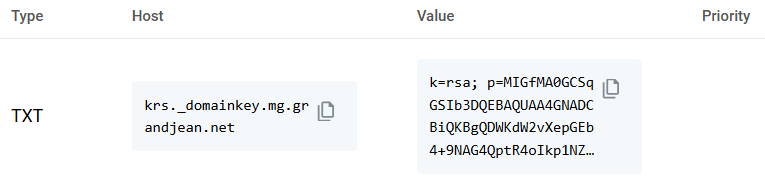
As a reminder, the DKIM record acts as a wax seal on your outgoing emails.
The sending server (Mailgun in this case) uses a private key (the engraved brass sealing tool) to cryptographically sign the email. The receiving server checks this DNS record to get the public key needed to decrypt the message. DKIM provides cryptographic proof that:
- The email came from an authorized sender (i.e., someone with the private key)
- The email contents have not been tampered with between the sending and receiving servers
This record actually requires adding an additional subdomain record before we create the TXT record.
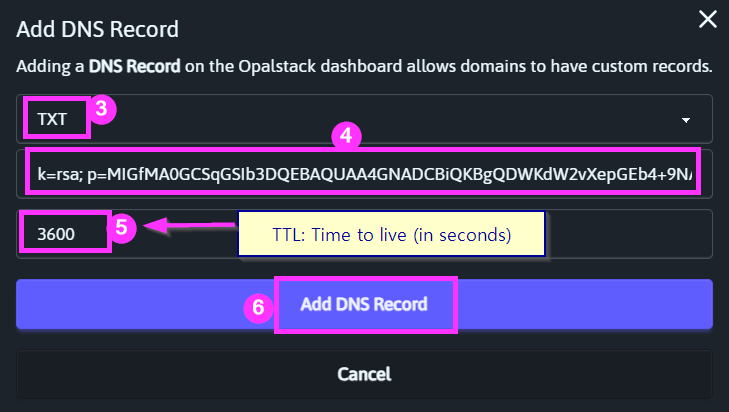
I left the TTL (time to live) value set to Opalstack's default of 3600 seconds (i.e., one hour).
This value is essentially a refresh rate. It tells DNS lookups how long to consider a value valid before going back to the name server to check for updates.
A lower number will allow changes you make to propagate faster across the internet, but it will also negatively impact the name server's performance.
When changing DNS configurations, you may want to temporarily set this value lower (e.g., 300 = 5 minutes) so that if you screw something up you can apply a fix faster. Once the configuration has been tested, though, you should return this value to a larger number to avoid negatively impacting performance.
Some name servers will place limits on how small this number can be.
SPF Record

Your domain's SPF record is where you announce to the kingdom who your authorized couriers are (i.e., who is authorized to send emails on behalf of your domain).
WARNING!!! Here there be dragons!
Be especially careful if you are NOT using a new subdomain to send your Mailgun emails. If you want to send Mailgun emails from a domain that is already being used to send regular emails (e.g., via Outlook), then misconfiguring the existing SPF record can break email deliverability for your existing Outlook emails–not just the new Mailgun emails. (This is a big reason that I recommend setting up a Mailgun-specific subdomain to send automated emails.)
Also, if there is an existing SPF record for the domain, you must UPDATE the EXISTING record. Adding a second SPF record can also break email deliverability for your domain.
Be sure to read and understand the following article before going any further:

With those caveats and warnings out of the way, let's proceed:
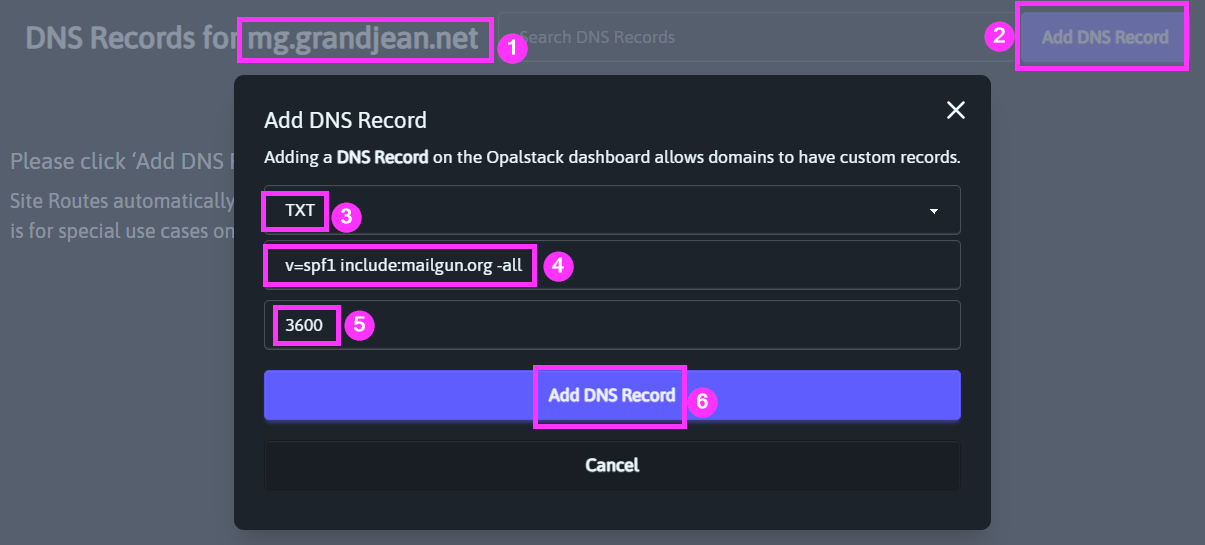
Note that I modified the Mailgun-recommended SPF record value to switch from a soft fail (all~) to a hard fail (-all). Here's the actual value I used:
v=spf1 include:mailgun.org -allKeep in mind, I added this DNS record to my custom subdomain: mg.grandjean.net.
My primary domain–grandjean.net–has the following SPF record:
v=spf1 include:spf.protection.outlook.com include:spf.opalstack.com include:_spf.mlsend.com a:_spf.google.com ~allThat record covers four different authorized senders:
- Exchange Online
- Opalstack
- MailerLite
- GMail
If I wanted to add Mailgun to that list, I would have updated the SPF record as follows:
v=spf1 include:spf.protection.outlook.com include:spf.opalstack.com include:_spf.mlsend.com a:_spf.google.com include:mailgun.org ~allMX Records
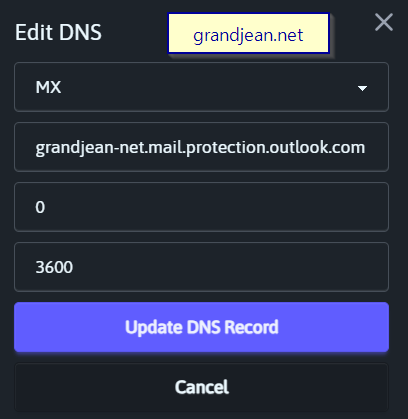
Unlike SPF and DKIM records, which affect outgoing email, MX records provide routing instructions for incoming email.
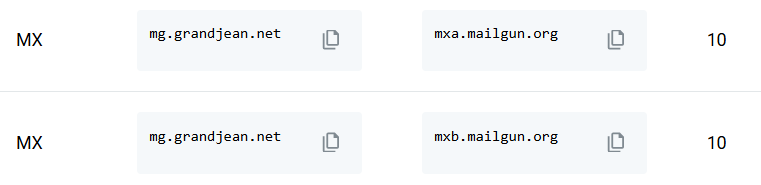
If you are using an existing email sending domain (e.g., @grandjean.net in my case), then you probably already have MX records set up to redirect your incoming emails to your email service provider (such as Exchange Online). For example, here's the MX record for my primary domain:
If you are creating a new subdomain to send your emails from, there won't be any MX records associated with it.
While you may not care too much about replies to your automated emails (especially if you plan to send them from a "no-reply" email address), you should have some sort of plan for what to do about them. At minimum, you should have MX records defined because other email service providers will ding your reputation if the MX records are missing.
Think of it this way: if you got a call from a "charity" seeking donations but when you tried to call the number back you got a message saying, "This number is not in service," you'd be justifiably suspicious. Sending emails from a domain that does not accept replies is a red flag.
Here are the MX records I'm adding for my mg.grandjean.net custom subdomain:
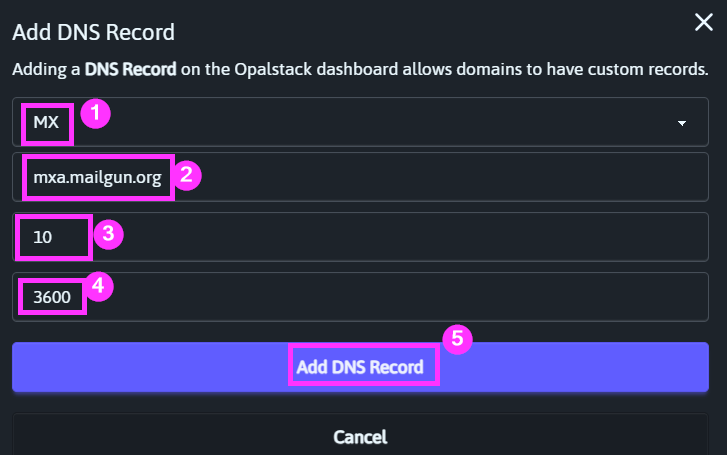
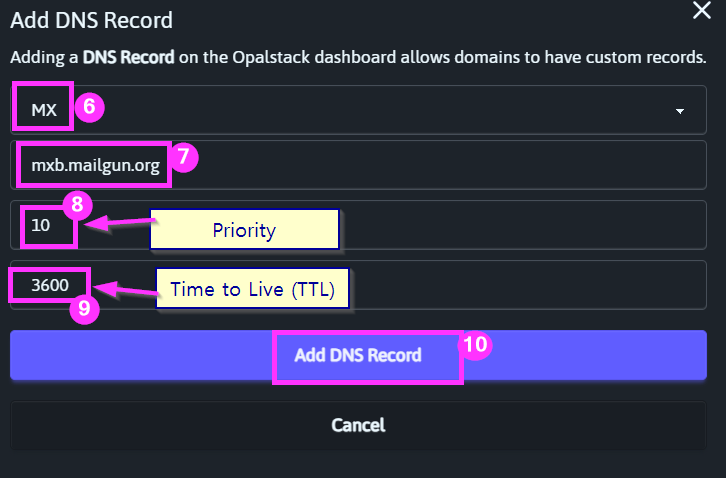
A couple of quick notes:
- Unlike SPF records, it's OK to have multiple MX records (assuming you have multiple email servers)
- Multiple MX records can be used for redundancy and/or load balancing
- To designate primary and backup mail servers, assign a lower priority number to the primary server
- To use load balancing, assign the same priority to both MX records (as shown above)
If you already have MX records set up for an existing domain and you are using that domain for Mailgun email sending, you likely do not want to add any MX records. Doing so would risk incoming emails being lost if they get routed to an unmonitored mail server.
Mailgun Inbound Routing - Subdomain Email Forwarding
If Mailgun will be receiving replies to your emails (e.g., because you have set up a Mailgun-specific subdomain as I'm demonstrating here), then you need to tell Mailgun what to do with them when they arrive.
The Mailgun service is optimized for sending emails.
It is not intended to be a full email mailbox service where you store received emails for a long time. Rather, Mailgun encourages you to set up automations to deal with inbound emails as they arrive.
The simplest thing to do is forward incoming emails to another address, such as one on your primary domain account. Let's do that now:
First, log in to Mailgun, expand "Send", click on "Routes" under "Receiving", then click [Create route]:
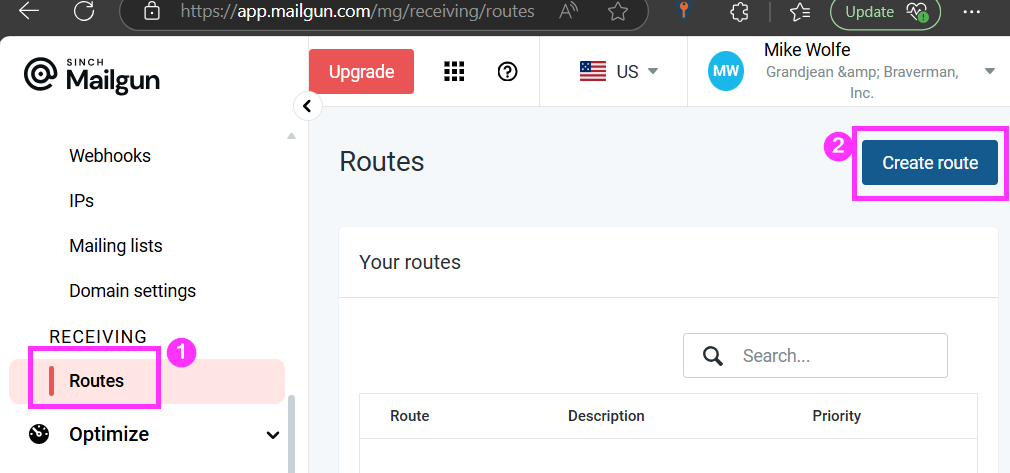
Configure the following option values:
- Expression type: Match Recipient (the "Catch-All" option sounds tempting, but it will forward spam messages sent to common emails like "webmaster@", etc.)
- Recipient:
system@mg.grandjean.net(forward replies to this address) - [√] Forward:
mailgun@grandjean.net(forward a copy of the message to this address on my primary domain) - [_] Store and notify (do not retain the message on Mailgun's servers)
- [√] Stop (do not process any additional routes)
- Priority: 10 (this defaults to 0, but that won't allow us to insert higher priority rules in the future without renumbering all other priorities)
- Description: Forward system@mg.grandjean.net replies to mailgun@grandjean.net
CNAME Record

CNAME ("Canonical Name") records are essentially aliases from one domain (or subdomain) to another.
- The CNAME record above maps
email.mg.grandjean.nettomailgun.org - This record is used for tracking opens and clicks in your emails.
- When you send emails through Mailgun that include tracking, the tracking links will use this subdomain, allowing Mailgun to collect engagement metrics while maintaining your branding.
Like with the DKIM records earlier, we first need to add a new subdomain:
And then add the "CNAME" DNS record:

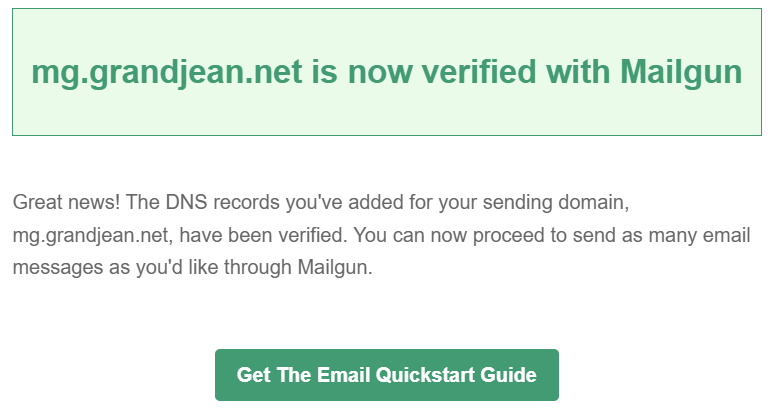
Domain Verification Complete Email
If everything went well, you should receive the following confirmation email from Mailgun:
Conclusion
In this article, we walked through the complete process of setting up a custom sending domain with Mailgun. We covered:
- Choosing an appropriate domain name, with considerations for using a subdomain (like mg.grandjean.net) to separate transactional emails from regular business communications
- Adding the required DNS records to your name server:
- DKIM record for email authentication
- SPF record to authorize Mailgun as a legitimate sender
- MX records for handling incoming mail
- CNAME record for tracking opens and clicks
- Setting up inbound routing to forward replies to your main email address
By following these steps, you've configured Mailgun to send emails using your own branded domain rather than the default sandbox domain. This provides a more professional appearance and better deliverability for the automated emails sent by your Access applications.
In future articles, we'll cover additional topics including:
- DMARC reporting
- Creating application-specific API keys
- Setting up SMTP user accounts
Acknowledgements
- Article excerpt generated with the help of Claude-3.7-Sonnet
- "Conclusion" section generated with the help of Claude-3.7-Sonnet
- Cover image generated by FLUX-schnell