HOW TO: Access the Windows Startup Folder
In previous versions of Windows, the Startup folder was easy to find from the Start Menu. This quick tip makes the Startup folder easy to find again.


An easy way to launch scripts or applications when you log on to Windows is to add shortcuts to your user profile's Startup folder.
This is especially useful for things like AutoHotkey scripts. In older versions of Windows, there was a Startup folder in the Start Menu and you could just right-click on it and tell Windows to open it. Once it was open, you could [Alt]-Click Drag to create shortcuts in the folder. Any executable item in the folder would run when you logged into Windows.
That folder still exists in the file system, but it's no longer available from the Start Menu. Windows has "replaced" its functionality with a new "Startup Apps" Windows app, but there's something to be said for the simplicity of creating a shortcut icon in a folder. While you can get to the folder by manually navigating through File Explorer, it's typically found nine levels deep in the folder hierarchy!
If you don't want to have to remember how to drill down through nine levels of subfolders, read on for a simpler alternative.
Startup Folder Location
The Startup folder I'm referring to is the profile-specific startup folder. Whatever you add to this folder will only affect your login, not anybody else who uses the computer.
Typical Roaming Profile Folder Location
Since it's profile-specific, it's a subfolder of your roaming profile folder. By default, that folder can be found here:
C:\Users\{UserName}\AppData\RoamingFinding YOUR Roaming Profile Folder
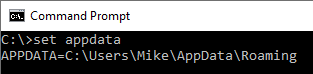
The most reliable way to find your specific folder is to use the AppData environment variable. To do this, open a Command Prompt ([Win] + [R] > cmd > [OK]), then type:
set AppDataWhen used without an equal sign, the set command returns the current value of an environment variable:
Navigating to the Startup Subfolder in File Explorer
The Startup subfolder itself is several levels down from AppData:
- Microsoft
- Windows
- Start Menu
- Programs
- Startup
To quickly navigate there, open File Explorer ([Win]+[E]), go to the address bar ([Alt]+[D]), then paste the following text and press [Enter]:
%AppData%\Microsoft\Windows\Start Menu\Programs\StartupNavigating to the Startup Subfolder from a Command Prompt
Open a command prompt and paste the following text then press [Enter]:
cd /d "%AppData%\Microsoft\Windows\Start Menu\Programs\Startup"Note that the /d flag will change the current drive if necessary.
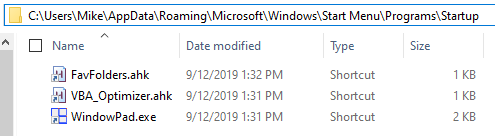
My Startup Folder
Here's a screenshot of my Startup folder location. The three items I have in there are all AutoHotkey scripts (WindowPad.exe is simply a compiled AutoHotkey script).
Creating a Startup Environment Variable
The above commands are certainly easier than having to navigate the subfolders by hand, but they still require you coming to this web page to copy them first or memorizing the full folder structure.
Luckily, there's a better way. I covered this technique as it relates to SharePoint folders in two previous articles. Basically, it boils down to adding a persistent environment variable via the cmd window using the setx command (does not require an Admin command prompt).
Here's how to create a permanent Startup environment variable that points to your user profile's Startup folder:
setx Startup "%AppData%\Microsoft\Windows\Start Menu\Programs\Startup"Just run the above command from a normal Command Prompt ([Win]+[R] > cmd > [OK]).
Using the New Startup Environment Variable
In File Explorer
Open File Explorer ([Win]+[E]), go to the address bar ([Alt]+[D]), then paste the following text and press [Enter]:
%Startup%In a Cmd Prompt
Open a command prompt ([Win]+[R] > cmd > [Enter]), paste the following text, and press [Enter]:
cd /d %Startup%