Configuring Firewall Settings on Azure SQL Server
The simplest way to configure access to Azure SQL Server is via IP4-based firewall rules. We'll explore the pros and cons of a few different approaches.


The first time you try to connect to a new Azure SQL Server instance, you may get the following error message:
Your client IP address does not have access to the server. Sign in to an Azure account and create a new firewall rule to enable access.
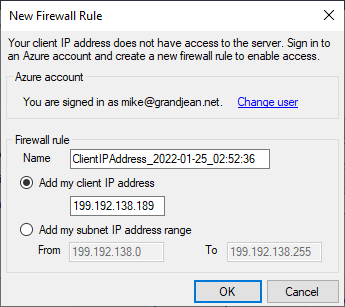
Conveniently, Azure offers to create the new firewall rule for you automatically. In fact, Azure offers two firewall rules to choose from:
- Add my client IP address
- Add my subnet IP address range
The "Add My Client IP Address" Option
The first option adds your public IP address to the list of allowed IP addresses that may connect to the server. Remember, your public IP address is usually different than your workstation's IP address that appears when you run ipconfig from the cmd window.
These days, most individual computers are assigned private network addresses. If your computer's IP address is in one of the following ranges, then it is a private address (i.e., not accessible directly from the internet):
- 10.0.0.0 - 10.255.255.255 (many corporate networks use this 10.0.0.0/8 subnet)
- 172.16.0.0 – 172.31.255.255 (this is probably the least used private subnet)
- 192.168.0.0 – 192.168.255.255 (most consumer routers run on this 192.168.0.0/16 subnet)
The IP address that appears on the "New Firewall Rule" message is how the Azure SQL Server machine sees your device. If you are connecting from home, this is likely your WiFi router. If you are connecting from work, this is probably your corporate firewall.
So, although this first option is only adding a single IP address, if that IP address belongs to your company firewall, you may actually be granting access to hundreds or thousands of workstations. Of course, the other computers on that local network are likely trustworthy. Except for Josh in HR. Something is off with that guy.
All joking aside, this is probably the most secure option when setting up public access to Azure SQL Server. It's also the easiest to set up, which is a nice bonus.
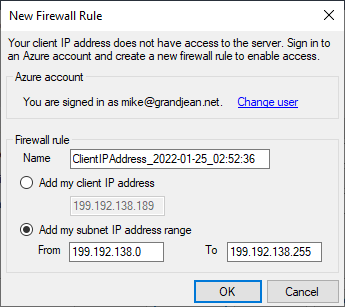
The "Add My Subnet IP Address Range" Option
This option also uses your public IP address to create a new firewall rule, but instead of whitelisting a single IP address, it whitelists a block of IP addresses.
The dialog box takes a naïve approach to defining the subnet, though. All it really does is apply a 24 bit subnet mask (255.255.255.0) to your public IP address. This creates a block of 255 IP addresses.
If you are issued a dynamic IP address, it is subject to change at any time. Conceptually, the idea behind adding a Subnet IP Address Range is that you would be covered if your IP address matches any of the addresses within the range.
This is a great idea in theory, but in practice it's usually not that useful.
Subnet IP Address Range: A Typical Example
When I checked the public information for my IP currently issued IP address (199.192.138.189), I realized it was part of a larger block of IP addresses than the block of 255 that Azure SQL prefilled in the dialog box:
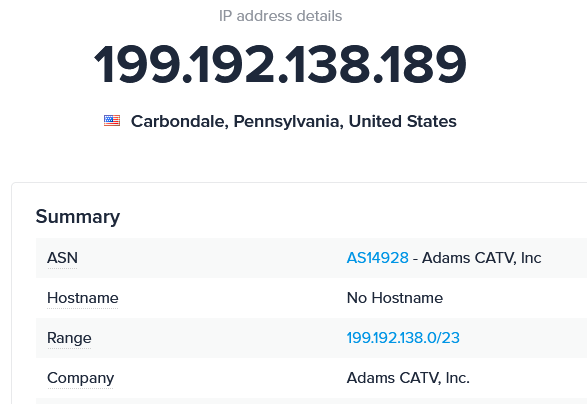
The block of addresses to which my IP address belongs is defined in CIDR format in the Range row above as 199.192.138.0/23. Using my CidrToRange function, we can see that the full IP address range is 199.192.138.0 to 199.192.139:

I thought I would be clever and add this range of IP addresses to my server firewall. That way, no matter what IP address my ISP issued me, I would be covered. Or so I thought.
When I set up the IP address range, I did so from my work computer. When I tried accessing SQL Server from my home computer (via the same internet service provider [ISP]), I received the error message shown at the top of this article. So, what happened?
It turns out that my ISP does not have just a single block of IP addresses. In fact, my particular ISP has 23 blocks of addresses. So, if I wanted to preemptively whitelist every possible IP address, I would have to add all 23 ranges to my Azure SQL Server firewall settings.
Modifying Azure SQL Server Firewall Settings
While the option in the dialog box to create a new firewall rule is convenient, it is not the only way to manage those settings.
- Log in to Microsoft Azure
- Click on your SQL server resource (likely listed under "Recent resources")
- Click on the "Show firewall settings" link
This should bring you to a page that looks like this:
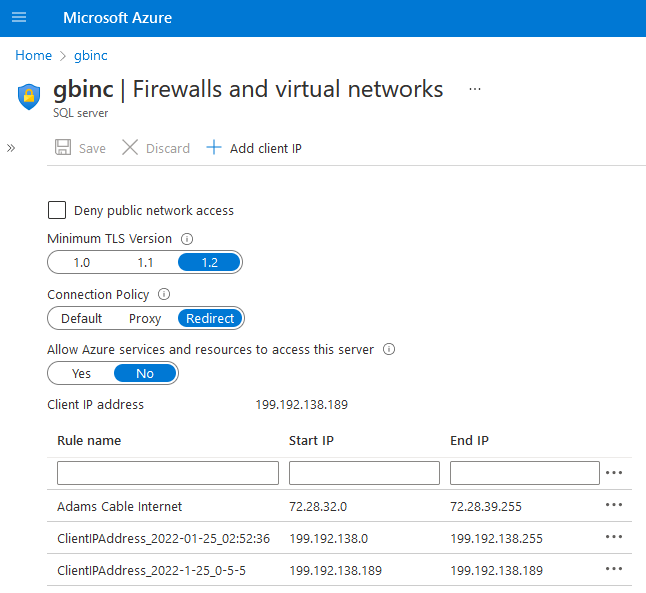
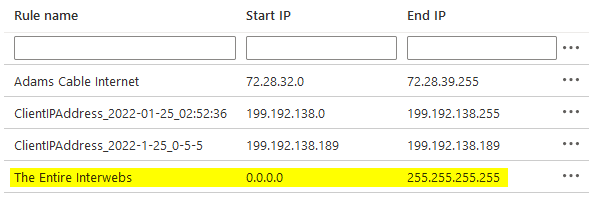
In the screenshot above, you can see the first rule where I tried to create a block of addresses that would encompass all of the possible dynamic IP addresses that my ISP might issue. I created this rule from the above page, which is why it has a friendly "Rule name."
The second rule was created using the "Add client IP" link as seen at the top of the screenshot.
The third rule was created by clicking on the "Add my subnet IP address range" option in the "New Firewall Rule" dialog box as shown below:
My Recommended Settings
I have three different recommendations, depending on your particular use case.
Internal Developer Use
For your own personal use–or, if you own a small business, for your own employees' use–I recommend using the "Add my client IP address" in the dialog box to add a single IP address to the list of firewall rules.
While your client IP address could change, in practice it will likely remain the same for months at a time. Since there is so little friction involved in updating the whitelist with your current public IP address, there's very little downside to this approach. The upside is tremendous, in that it practically eliminates the possibility of someone gaining unauthorized access to your data.
Corporate Client Use: On-Premises
If you have corporate clients that will be accessing the Azure SQL databases in a production environment, I recommend whitelisting the company's public static IP address(es).
Most medium and large businesses will have static IP addresses that point to the company firewall. If all the users accessing the database server are doing so from the same internal network, then a single IP address may be enough to cover everybody.
Client Use: Small Business or Work-From-Home Scenarios
Sometimes whitelisting individual static IP addresses will not be practical.
A couple of examples are small business clients who do not have static IP addresses and clients with work-from-home employees. In both cases, you can't know ahead of time what IP address the end-user will be connecting from.
Unlike the first scenario, these users won't have the necessary permissions to simply change the firewall rules to whitelist their IP address. If you don't want to be getting calls from your users at all hours of the day, you may need to go with a more permissive approach.
The most permissive approach would be to simply white list every single IP4 address available by setting the Start IP to 0.0.0.0 and the End IP to 255.255.255.255. Here's an example:
If you do need to fall back on this approach, I would strongly recommend making up for the loss of protection in other ways, such as disabling SQL Server password authentication and requiring multi-factor authentication on your users' Azure Active Directory accounts.
Related articles
 Mike Wolfe